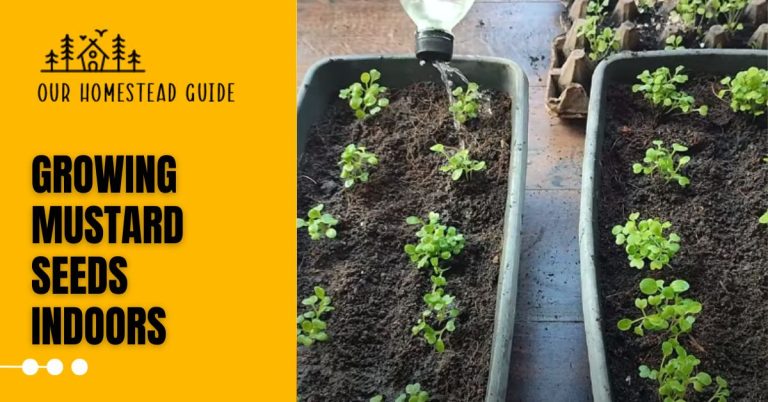
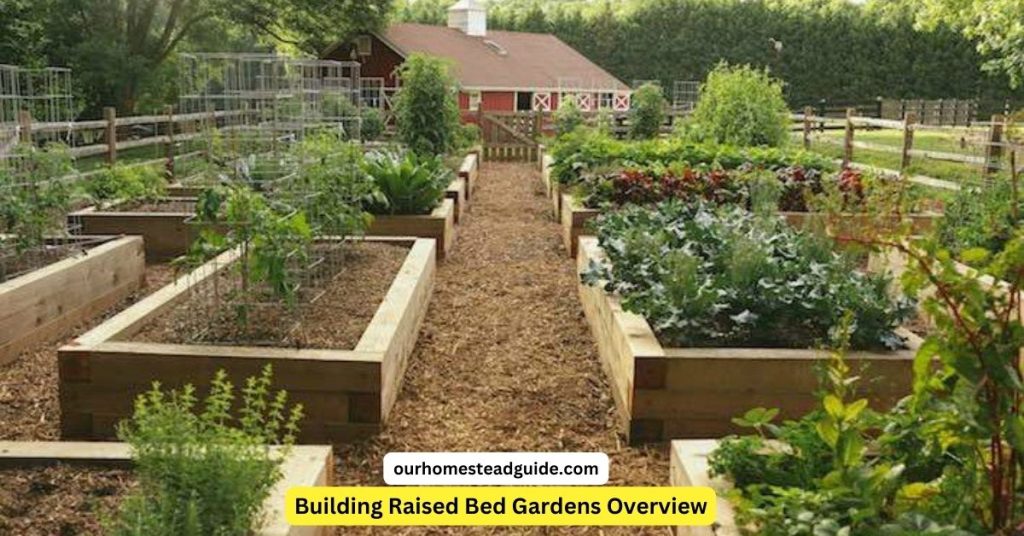
How to Building Raised Bed Gardens: Easy Steps
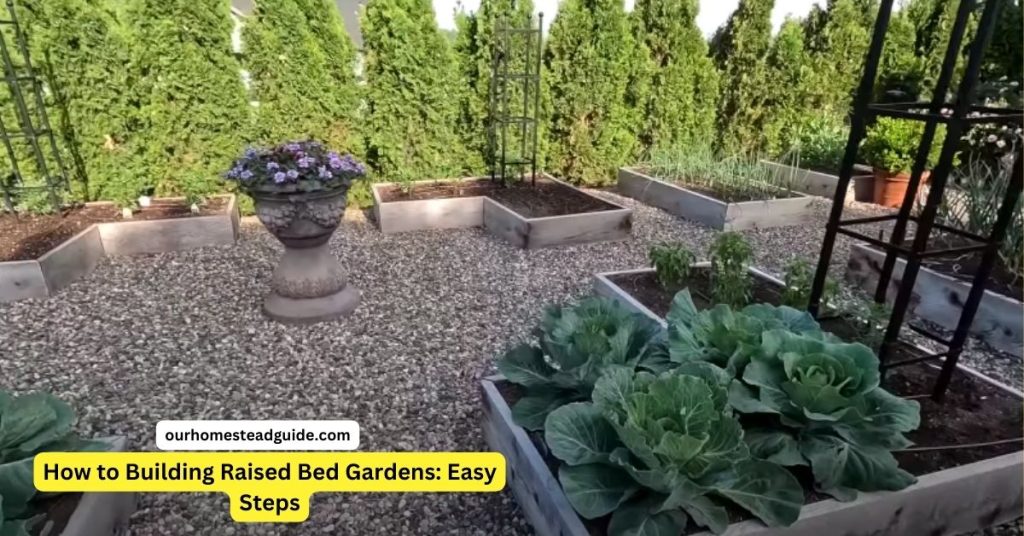
Building Raised Bed Gardens These raised garden plots have several advantages, including longer growing seasons, better drainage, simpler weed management, and beautiful aesthetics. Building your own raised beds is an easy project that will infuse your outdoor area with bright life and new taste, regardless of your level of gardening experience.
So, prepare to create a flourishing garden haven, one raised bed at a time, by gathering your equipment and selecting your preferred vegetables and herbs!
What Is a Raised Garden Bed?
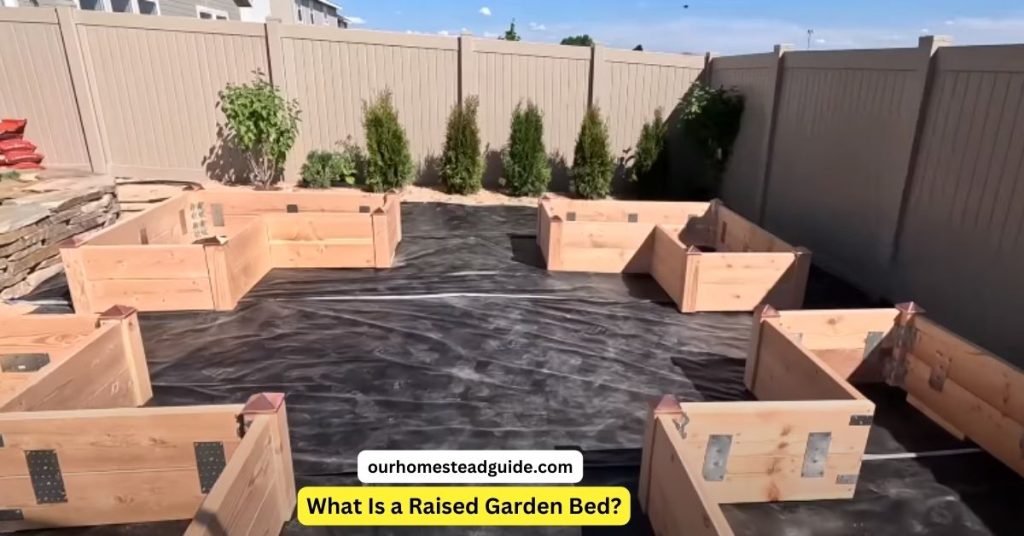
However, let us begin by explaining. The term “raised garden bed,” or just “raised bed,” refers to a freestanding box or frame that is placed aboveground in a sunny area with high-quality soil. Traditionally, raised beds have no bottom or top. Raised beds often have an open bottom to allow plant roots to reach nutrients in the soil below ground.
Of course, creating an elevated bed doesn’t have to be much easier than that. All you need to do is construct an elevated bedstead, pile the dirt to a height of 6 to 8 inches, and level the top. No more resources are needed for this (beyond dirt).
Building Raised Bed Gardens Overview
| Aspect | Details |
|---|---|
| Project | Building Raised Bed Gardens for Monica and Nick’s garden. |
| Previous Videos | Description of previous videos related to the ongoing project. |
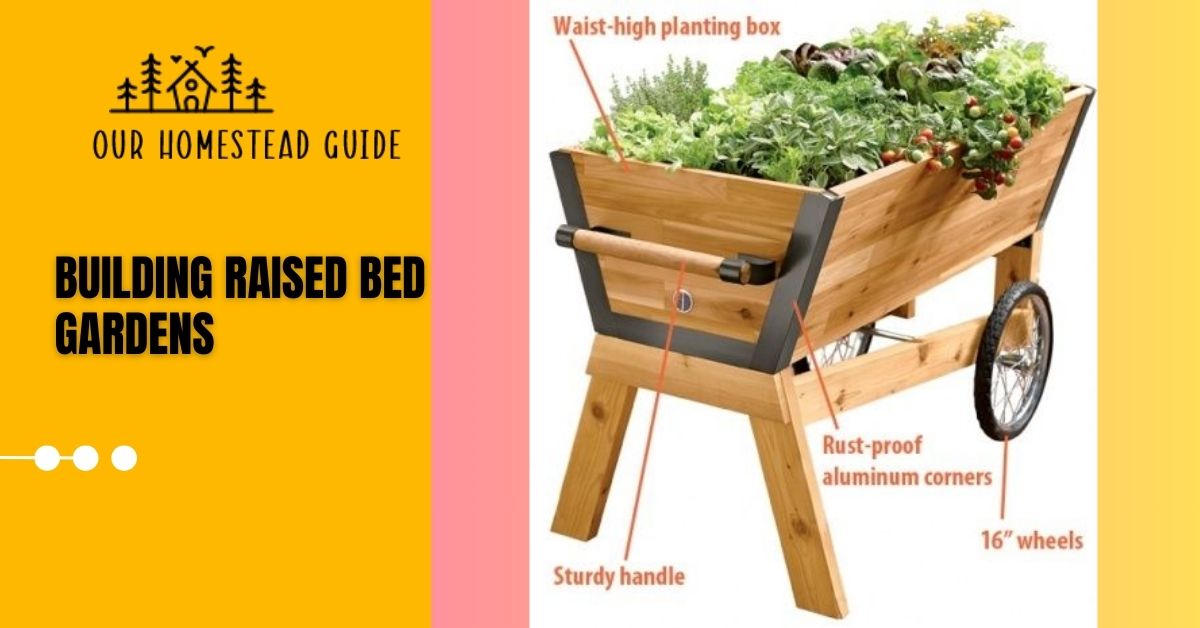
| Supplies and Measurements | Discussion of materials needed: 2×10 or 2×12 timber, tools, metal brackets, and copper caps. |
| Raised Bed Design | L-shaped formation with dimensions of 3 feet by 6 feet for optimal planting space. |
| Example Raised Bed | Presentation of a similar raised bed at the creator’s house made with Redwood and 2×10 or 2×12 lumber. |
| Preparation and Cutting | Planning, cutting long runs (54 inches), and post dimensions (3.5 inches). |
| Metal Brackets and Construction | Use of metal brackets (Simpson’s strong tie A35Z) for stability. |
| Transporting Materials | Loading supplies safely for transportation to Monica and Nick’s garden. |
| Assembly at Monica’s House | Unloading, assembling, leveling, and adding copper caps for aesthetic appeal. |
| Garden Space Consideration | Observations on how raised beds enhance the overall garden space. |
| Landscaping and Features | Overview of landscaping features, trellises, rock walls, and potential plantings. |
| Drip System and Mulching | Plans for installing a drip system, using brown mulch for contrast. |
| Completion and Future Plans | Satisfaction with progress, excitement for future additions like fountains and espaliered fruit trees. |
| Acknowledgment | Recognition of the effort invested in the project. |
Benefits of Raised Garden Beds
Raised garden beds are a popular choice for producing colorful flowers, tasty veggies, and everything in between since they provide a plethora of advantages for both novice and seasoned gardeners. Here are a few main benefits:
Enhanced Soil Quality:
About the soil in your raised beds, you are in charge. Eliminate the constraints of the current ground soil by creating a customized mix that is rich in nutrients and suited to the demands of your particular plants.
Improved Drainage:
Wave goodbye to concerns about standing water! Raised beds’ elevated shape lets extra water to drain out easily, avoiding root rot and encouraging strong plant development.
Weed Control Made Easy:
A natural barrier against intruders is created by the well-defined boundaries and the possible use of landscape fabric. No more excruciating struggles with weeds that won’t go away!
Accessibility for All:
Taking care of a garden shouldn’t be a backache. Because raised beds remove the need for frequent bending and kneeling, individuals of all ages and abilities may enjoy gardening.
Extended Growing Season:
Take advantage of additional sunlight! Raised beds’ black walls retain solar heat, warming the soil early in the spring and increasing your yield potential into the fall.
Versatility & Design Freedom:
Unleash your inner artist! Raised beds may be made to order in any size, shape, or material to suit your room and style choices. Transform your landscape into a unique artistic creation.
Reduced Soil Compaction:
Say goodbye to squishing when walking! Foot movement does not compress the soil in raised beds, which promotes healthy plant development and ideal root growth.
Protection from Pests and diseases:
To promote a healthy garden environment, the elevated platform can act as a barrier against certain pests and illnesses that can be hiding in the soil.
Choosing the Right Material for Raised Beds
The success and durability of your garden depend on the material you choose for raised beds. Raised beds can be constructed from a variety of materials, each with pros and cons of their own. Here are a few well-liked choices:
Wood:
Advantages: Wood is a traditional option for raised beds. It’s easily obtainable, reasonably priced, and simple to use. Due to its inherent resistance to insects and deterioration, cedar and redwood are attractive options. Another alternative is treated lumber, but because of the chemicals used in the treatment, it should be utilized with caution.
Cons: Wood can ultimately decay, particularly if improper care is taken. Certain treated timber has chemicals in it that could seep into the ground.
Metal:
Advantages: Metal is strong and long-lasting. Examples of this include aluminum and galvanized steel. It has a sleek, contemporary appearance and won’t rot or deteriorate with time.
Cons: Because metal can absorb and hold heat, the temperature of the soil may rise. Make sure the treated metal hasn’t been exposed to any hazardous substances before utilizing it.
Concrete Blocks:
Advantages: Concrete blocks offer superior stability and longevity for raised beds. Additionally, they hold onto heat well, which is advantageous in colder areas.
Cons: The alkaline nature of concrete may alter the pH of the soil. To stop the dirt from coming into direct touch with the blocks, you may cover the inside with plastic.
Cinder Blocks:
Advantages: Like concrete blocks, cinder bricks are easily accessible and offer strong solidity. Additionally, they have holes where you may insert little flowers or herbs.
Cons: Like concrete blocks, cinder blocks have the potential to absorb and hold heat, which may alter the pH of the soil.
Composite or Plastic Materials:
Advantages: Materials made of plastic or composites are strong, lightweight, and insect- and rot-resistant. They frequently consist of repurposed materials as well.
Cons: Composite or plastic materials might not be as aesthetically pleasing to certain people. Make sure they are resistant to UV rays to avoid degradation from exposure to the sun.
Stone:
Advantages: Stone has a lovely, natural appearance. It is resilient and does not deteriorate with time.
Cons: Stone may be pricey and hefty. Heat retention is another effect it has on soil temperature.
Blocks:
Pros: Raised beds appear elegant and are quite stable when made of bricks. They are resistant to different weather conditions and don’t deteriorate with time.
Cons: Bricks may be costly and hefty, just as stone.
How Wide Should Your Raised Bed Be?
To allow you to reach the garden without having to step inside, garden beds should not be wider than four feet. Thankfully, lumber is frequently cut in 4-foot sections.
- Entering the bed is not recommended. It compacts the soil, which makes it more difficult for plant roots to absorb necessary oxygen. If the bed is made too broad, it will be challenging to get to the center, which will make harvesting and weeding challenging as well.
- Since you would only be able to reach the garden from one side, we advise building your raised bed no wider than 2 to 3 feet if it is going up against a wall or fence.
Length is less significant. A 4 x 4 or 4 x 8 or 4 x 12 bed may be made. You may make it as long as you like, but I think that making many shorter beds is simpler than making one long one. Furthermore, separate bedrooms work well for many crop families.
How Deep Should a Raised Bed Be?
Lumber, including cedar, often comes in conventional sizes, with a height of 6 inches. Stated differently, the dimensions are 2 inches by 6 inches by 8 feet. (Take note that boards purchased from a lumber yard are 5.5″ high by 1.5″ thick.)
Another option is to stack the two boards. Two stacked “2 x 6” boards are 12 inches tall (really 11 inches).
Yes, you may go higher (18 inches, 24 inches, 36 inches), but keep in mind that the weight of the extra dirt will put more strain on the sidewalls. Cross-supports must be added to any bed that is higher than 12 inches.
Think about the things you could develop. The soil’s depth is a crucial factor that varies based on the amount of soil depth required below ground for the crop. As an illustration:
Carrots, parsnips, potatoes, tomatoes, and squash are examples of deep-rooted crops that require a minimum soil depth of 12 to 18 inches. The roots of plants cannot reach deep enough to obtain nutrients if the soil is not loose enough down to this level.
Crops with shallow roots, including onions, lettuce, and greens, require a minimum soil depth of 6 inches.
You might just make sure that your mattresses are between 12 and 18 inches deep to keep it safe. You’ll need to loosen the earth under your frame to accommodate the height you decide on. For instance, if you want to plant root vegetables in a bed that is 6 inches high, we suggest loosening the soil 6 to 9 inches farther below the surface. There is no requirement if you are merely cultivating crops with shallow roots.
Location for Building Raised Bed Gardens
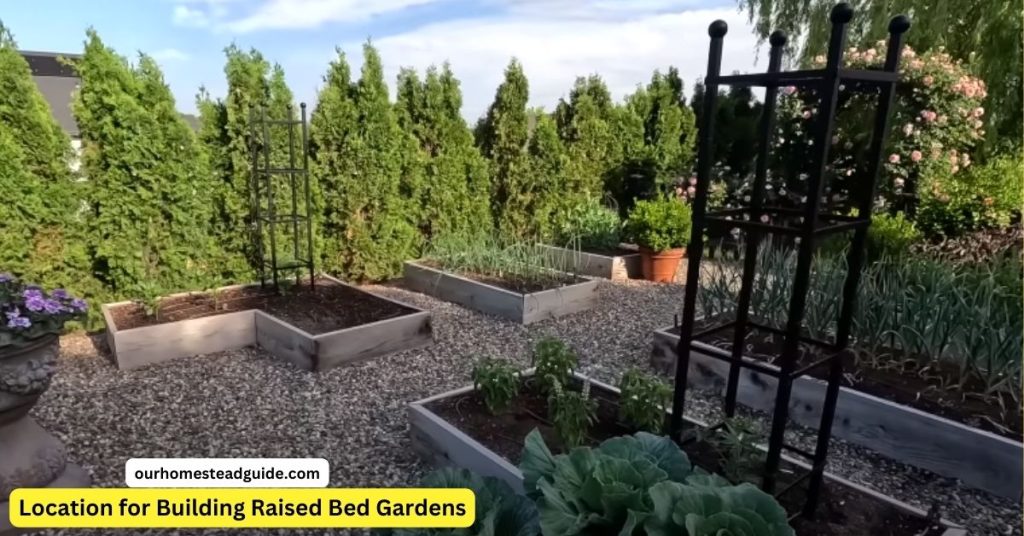
Sites for raised beds must receive plenty of sunlight! The prerequisites are as follows:
- The majority of vegetables require six to eight hours in full sun (or direct sunlight) each day, particularly after lunch.
- even, level terrain.
- Near the home for convenient access to harvesting and weeding
- Never place your bed in a frost pocket or a windy area.
- Steer clear of any damp or swampy places since soil needs to drain properly.
Preparing the Site: Option 1 (Basic)
To construct a simple raised bed, mark the desired location using string. As previously said, maintain a width of 3 to 4 feet to ensure easy access to the center.
Smothering the grass in the area is beneficial, but if sod or grass is already present, cut it very short and remove it, keeping the larger clumps to one side.
Turn the sod clumps inside out, loosen the soil in the bed, and add any additional additives you want to use to raise the soil’s level to the bed, along with any dirt that you scrape off of the pathway surrounding it.
If you choose to stop now, you can.
Preparing the Site: Option 2 (No-Dig)
Some gardeners don’t bother removing the turf since, if the layer of soil is deep enough, it will keep out the grass and weeds underneath. Charles Dowding, a gardener, invented the “no-dig” technique. According to his theory, weeds grow more quickly when more weed seeds are brought to the surface of the ground by digging.
Digging destroys the intricate life and structure of your soil, making it less able to hold moisture and correctly drain. It also speeds up the loss of nutrients, meaning you will need to feed your plants more frequently.
Here’s how to construct an elevated bed the “no dig” way:
Cut any weeds or grass as near to the ground as you can. Next, suffocate the grass and weeds by covering the area with cardboard, which will ultimately decompose into the soil. (Be sure to remove any staples and tape since they won’t break down.)
To make sure no weeds get through the gaps, make sure the cardboard or newspaper is overlapped by around 6 inches. They’ll grab hold of any sunshine they come across.
Cover the cardboard with a thick layer of compost (4 to 6 inches). This will serve as your medium of growth.
It’s acceptable to start planting as soon as you set up. The cardboard will have begun to decompose by the time the roots get to it, allowing the roots to go further into the surface.
By the work of worms and other organisms, the compost you place on top should eventually seep into the soil below. Every autumn or winter, beds will need to be topped over with a couple of inches of new organic matter.
This will assist to progressively enhance the fertility and health of the soil, including the soil beneath the raised bed. Thus, you should have no trouble cultivating vegetables with deeper roots, such as root crops.
For Those With Compacted or Bad Soil
Digging below the surface is frequently required in soils that are affected by compaction or have other issues, but it only needs to be done once. This is especially crucial for crops with deep roots, like carrots, which thrive in soil that has been loosened and modified down to a depth of 10 to 12 inches, allowing water and air to reach the base of the plants.
1- Remove the top layer of grass, which should be approximately 10 inches deep or the depth of a shovel, after cutting it very short and digging it out. Working in rows may make this process easier.
2- Get rid of all the plant waste, old roots, and pebbles.
3- To slightly loosen the earth, dig a few more inches down with the shovel.
4- Add compost or other organic stuff to the soil. We advise that around 25% of your soil should consist of compost.
5- After that, put the top layer back on and combine the dirt layers.
How to Build Your Building Raised Bed Gardens
Let’s get the bed made! It just takes basic do-it-yourself abilities because you are creating a box, much like a sandbox. Purchasing a professional raised garden kit is OK, but the costs might be unbearable.
Tools
- Drill/driver and bits, screwdriver
- If cutting the planks yourself (vs. lumber store): Hand saw, tape measure
Materials
- Obtain three 8-foot-long 2″x6″ pieces of timber for a 4 by 8-foot bed. Better still if they have 2″ x 8″ or 2″ x 10″ timber. Obtain two pieces of lumber for a 4×4 bed.
- Ask the men at the lumber yard to cut the pieces in half if you don’t have a saw. Cut one of the sections in half so you have two 4 foot lengths to use for the ends of the 4 by 8 foot bed. First, split both sections in half for the 4×4 bed.
- Screws for the deck or outside
- Instead of using the end grain of the board, use a piece of 2X4 or 4X4 in the corners to give you something sturdy to screw or nail onto. This will make it stronger.
Make the Bed Sides
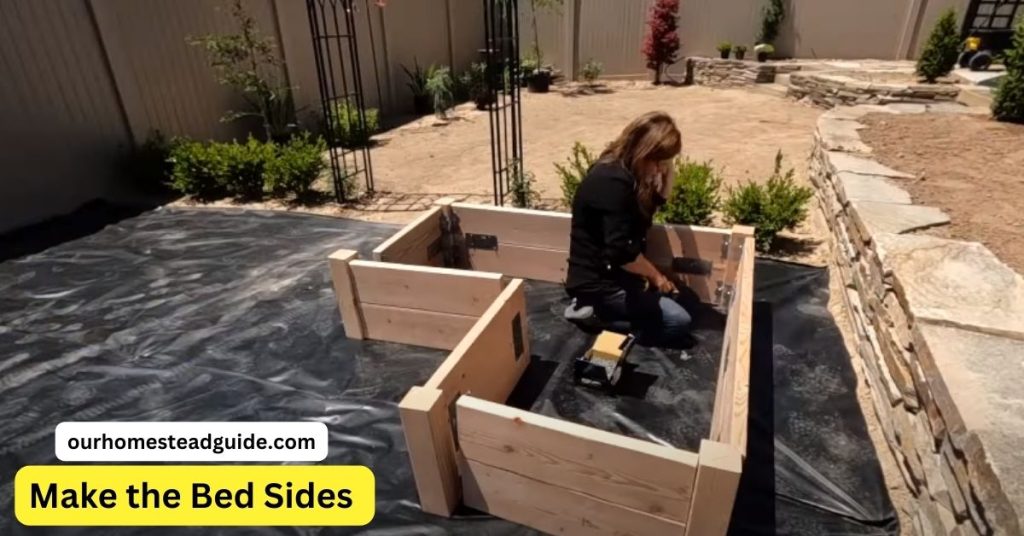
If the timber store did not pre-cut your two 8-foot boards, then cut each plank in half to make a 4 × 4 foot bed by marking the halfway point. There will then be four planks.
Decking screws are used to fasten the boards together. It is sufficient to drill two holes at each plank’s end. Use a drill bit that is somewhat narrower than the screws to drill pilot holes. As each plank ends in turn and screws straight into the next, make sure your pilot holes are positioned appropriately. Having someone hold it as you tie the corners makes the process simpler.
Cut the pine stake into four pieces and use them to fasten the boards at the corners for bracing if you’d like more bracing and a stronger structure.
Assemble the Raised Bed
We can now start assembling the bed because all of the wood has been cut to size and the holes have been drilled.
The beds should be made. The planks for the walls must be arranged such that they overlap one another, with the pilot holes at the overlapping ends.
Using large screws, fasten the walls together to ensure that they are firmly attached to one another.
We desire a tight, snug fit.
Filling a Raised Bed
Any garden’s most vital component is its soil, and the more organic matter it has, the better. Plants flourish because roots can easily access oxygen and water, and soil bacteria are nourished. The ideal equilibrium is as follows:
40% compost: Compost is a rich source of plant nutrients. Although you can make your own compost at home, your neighborhood garden shop may sell it in bags. While fresh manure may be used directly to your garden, aged manure can also be utilized. Study up on manure.
40% topsoil: “Potting soil” isn’t what we mean by topsoil; it’s too fluffy for raised beds. Additionally, local lumberyards, agricultural supply stores, and garden centers may carry bagged dirt.
20% aeration: A lot of commercial soil mixtures come with some perlite, pumice, or rice hulls already added for aeration. If not, you must install drainage equipment. Another effective drainage aerator is lava rock.
We would advise you to investigate a local landscape firm for built-in soil and compost mixtures if you are filling a large number of raised beds, since their prices should be lower. But, bagged is the best option if you’re only making a little bed.
There are two ways to get your bed filled:
As seen in the aforementioned video, some people add the topsoil after pouring in the compost, also known as composted manure.
Some people stack and blend the ingredients, much as in a lasagna.
Take whichever action suits you the best!
Add extra compost to your raised beds in the fall or winter as the growing season is coming to a close. It will increase soil fertility as it is incorporated into the soil, making it ready for planting in the spring.
Raised Garden Bed Soil Mix
This is the formula that we have been using for our garden beds for the past ten years.
For a single 4 by 4 foot elevated bed. (To fill bigger beds, multiply the quantities.)
Four cubic feet of superior soil
Three cubic feet of coconut coir (Note: While peat moss has historically been used to make garden soil, we suggest using coconut coir as an alternative because it is a more sustainable resource.)
Two to three cubic feet of manure that has been composted
Shredded leaves or grass clippings layered 2 inches thick.
If you do use grass clippings, be sure they are not from a lawn that has been treated with a fertilizer that contains granular herbicides to kill weeds or sprayed with herbicides.
Both persist and will kill plants up to three years after the initial application.
Hoe or cultivate all the ingredients, then give them a good watering. Make sure to add plenty of organic matter, such as straw, more leaves, or trimmings, to the mulch.
You most likely won’t need to apply much additional fertilizer to your plants or use it sparingly throughout the first year. However, in the next years, after your food crops absorb all the nutrients, your soil will require some amendment with additional compost or a balanced, slow-release fertilizer. Seek Advice on When and How to Fertilize Your Garden.
To keep the soil wet and discourage weed growth, cover the top of the planted bed with mulch (leaves, straw, pine needles, or more compost). Go over mulching in detail here.
What to Plant in Raised Beds
We suggest that if you’re new to gardening, you start with a single raised bed and experiment with growing some of your favorite veggies. In the end, a good-sized garden consists of four or five raised beds joined together.
The depth of your soil, which consists of the depth of your raised bed plus the depth of the soil you excavated and loosened below ground, is the sole restriction on what you may plant.
What grows well in 6” soil depth:
salad greens, spinach, radishes, onions, leeks, chives, cilantro, dill, mint, oregano, parsley, thyme, marigolds, and other blooms that bloom in the spring.
What grows well in 12” soil depth:
Along with everything in the “6” list, beans, beets, broccoli, Brussels sprouts, cabbage, cantaloupe, carrots, cauliflower, collards, cucumbers, garlic, kale, summer squash, Swiss chard, turnips, lavender, rosemary, sage, borage, calendula, cosmos, lantana, nasturtiums, snapdragons, and sweet peas.
What grows well in 18” soil depth:
Winter squash, melons, sweet potatoes, pumpkins, okra, peppers, and tomatoes, in addition to everything on the 6″ and 12″ lists.
Start Growing!!
You are now prepared to begin planting and tending to your garden after constructing your raised bed and adding soil and compost to it!
The Old Farmer’s Almanac Garden Planner is a useful tool! You may use your computer to quickly construct a garden layout. You won’t waste seed or overspend by knowing how many crops will fit in each space thanks to the Garden Planner. You have plenty of time to play around and plan your first garden when you take advantage of our free seven-day trial of Garden Planner!
how to build a raised garden bed cheap
Plan the raised garden bed’s size and location based on your available space and financial limits before beginning construction. Pick reasonably priced materials, such as pine or spruce, and for added cost savings, take into account recycled possibilities.
After cutting the boards to the appropriate lengths with a circular saw, build the bed by fastening the corners with screws that won’t corrode and making sure everything lines up. Level the ground, clear the garden area, and place the constructed bed. Stuff it with an economical blend of compost and topsoil that you buy in bulk to save money.
Apply mulch (optionally) made of wood chips or straw to reduce weeds and retain moisture. When the bed is prepared, plant the flowers, herbs, or vegetables of your choice, and take regular care of the garden. You may improve your outside area with an inexpensive raised garden bed that you design with thoughtful decisions.
how to build a raised garden bed cheap with legs
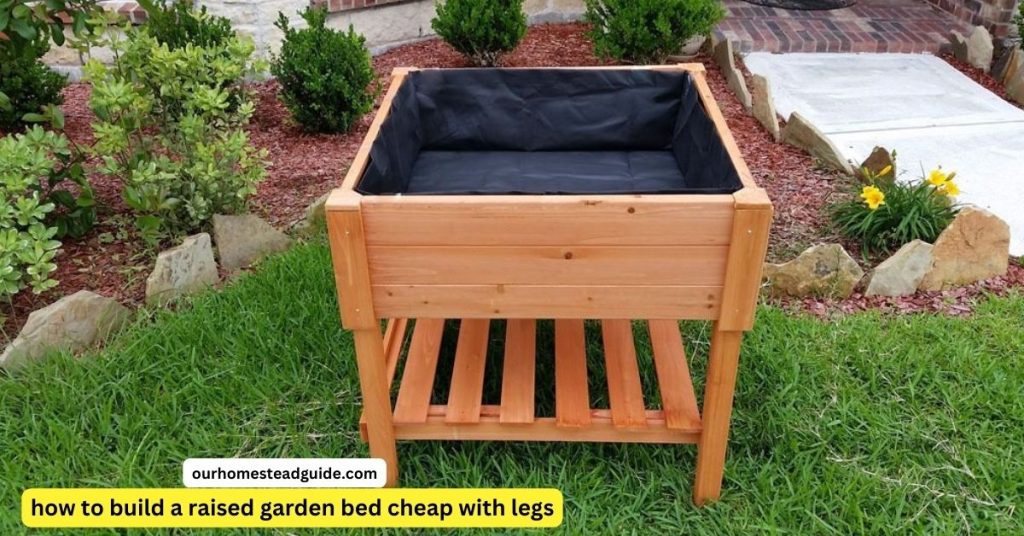
Building a cheap raised bed with legs is easy! Grab some recycled pallets or inexpensive lumber for the sides, cut to your desired size. Screw them together or use sturdy brackets for extra support. Secure legs built from fence posts or concrete blocks with screws or L-brackets.
Line the bottom with landscape fabric for weed control, fill with fertile soil, and voila! Your cheap and cheerful elevated garden oasis is ready. Add mulch for moisture and personalize with paint or decorations. Happy gardening!
how to build a raised garden bed with sleepers
It’s simple to construct a low-cost elevated bed with legs! For the sides, take some inexpensive timber or repurposed pallets and cut them to the required length. For additional support, use strong brackets or screw them together. Using screws or L-brackets, construct sturdy legs out of concrete blocks or fence posts.
Once you fill it with rich soil and cover the bottom with garden cloth to keep weeds out, you’re done! It’s time for your affordable and cheery raised garden haven. For moisture, add mulch, and decorate or paint to make it uniquely yours. Cheers to your successful gardening!
| section | Key Points |
|---|---|
| Introduction | – Project: Building raised beds for Monica and Nick’s garden. – Mention of previous related videos. |
| Supplies and Measurements | – Discussion of supplies, measurements, and wood types. – Beds described as L-shaped, 3×6 feet. |
| Example Raised Bed | – Presentation of a similar Redwood bed with copper caps. – Use of 2×10 or 2×12 lumber. |
| Preparation and Cutting | – Planning and cutting long runs (54 inches) and posts (3.5 inches). – Shaping ends and pieces. |
| Metal Brackets and Construction | – Use of Simpson’s strong tie A35Z brackets. – Experimentation and final decision on placement. |
| Transporting Materials | – Loading materials onto a truck for transport to Monica’s house. |
| Assembly at Monica’s House | – Unloading, assembling, leveling, and securing beds. – Attaching copper caps for aesthetics. |
| Discussion of Garden Space | – Observations on enhanced garden space. – Consideration of additions like a fountain or bench. |
| Landscaping and Additional Features | – Overview of completed landscaping and a trellis. – Discussion of potential plantings. |
| Drip System and Mulching | – Plans for installing a drip system under raised beds. – Decision to use brown mulch for contrast. |
| Completion and Future Plans | – Excitement about progress and increased space. – Ideas for future additions and grass seeding. |
| Conclusion | – Expression of satisfaction and excitement for future developments. – Acknowledgment of effort. |
Most Frequently Asked Questions!
1- What are the benefits of building raised bed gardens?
Raised bed gardens provide greater soil drainage, more control over the quality of the soil, and easier access for planting and upkeep.
2- What materials are needed to build raised beds?
The necessary supplies are 2×10 or 2×12 timber, proper tools, metal brackets (such Simpson’s strong tie A35Z), and copper caps for decoration.
3- What are the recommended dimensions for raised beds?
An L-shaped formation measuring three feet by six feet is a popular and useful size that offers a good planting space.
4- Can I use different types of wood for raised beds?
Yes, redwood is a very durable and attractive material. Cedar or pressure-treated wood are also good choices.
5- How should I plan and measure for raised beds?
Determine the needed measurements, choose a good spot, and then measure and cut the lumber appropriately.
6- Are metal brackets necessary for construction?
Simpson’s strong tie A35Z metal brackets offer support and stability. For a robust raised bed, the bracket positioning needs to be done correctly.
7- How do I transport materials to the garden site?
Make sure that every component is safely packaged before loading all of the supplies into a vehicle to be transported to the garden location.
8- What is the assembly process for raised beds?
Unload the supplies, put the beds together on location, level them with shims, and, for visual interest, affix copper caps to 4×4 posts.
9- Can raised beds enhance the overall garden space?
Raised beds may indeed produce a tidy and aesthetically pleasing garden area. For even more improvement, take into account adding things like seats or fountains.
10- What are some landscaping considerations for raised bed gardens?
Careful plant selections, trellises, and rock walls are examples of landscaping. To ensure effective watering, use drip irrigation as directed.
11- How do I install a drip system for raised beds?
Create a drip irrigation system to efficiently irrigate the raised beds. Mulch may be utilized for extra advantages and contrast, particularly brown mulch.
12- What are some plans after building raised beds?
Future designs can call for the addition of elements like seats, fountains, or even espaliered fruit trees. One may think of grass sowing as the last stage of landscaping.
13- Is it advisable to seek professional help for building raised bed gardens?
Even while many enthusiasts may construct raised beds effectively on their own, speaking with a qualified landscaper or garden specialist can offer insightful advice.
you may also like this article.
How to Companion Planting for a Productive Garden: Easy Guide