Canning Bean Soup: Step-by-Step Procedure
Soups are reduced in food waste and have a longer shelf life thanks to canning, which also maintains the soup’s nutrients and flavor. Canning Bean Soup that is ready to eat offers a tasty, time-saving, and practical answer for a variety of meal requirements, including last-minute weeknight dinners and emergency scenarios.
By reducing the possibility of bacterial contamination, it protects your family’s health. By using the suggested methods, you may maintain the soup’s flavor, texture, and nutritional content while still enjoying a consistently delicious meal. Adhering strictly to directions ensures effective and dependable outcomes, which adds fulfillment to the canning process.
To achieve a successful and secure preservation procedure, canning bean soup needs a specific set of necessary tools and carefully selected materials. Here is a list of everything you’ll need:
Equipment:
An essential tool for successfully preserving low-acid foods like bean soup is a pressure canner. It makes sure that the inside temperature reaches the point when hazardous germs and spores are destroyed.
Choose canning jars that can resist high heat and pressure variations. Mason jars are widely used and are available in several sizes.
Bands and Lids: These parts seal off the interior of the jars. Bands can be reused if they are in excellent condition, but lids should be fresh to maintain a proper seal.
Ladle and Funnel: A funnel keeps things clean and minimizes spills while a ladle aids in transferring soup into jars.
Jar Lifter: Using this device, you can safely handle hot jars when adding them to the canner and taking them out after processing.
Timer and Thermometer: For safe canning, precise timing and temperature monitoring are essential. It is crucial to have a trustworthy food thermometer and a kitchen timer.
Ingredients:
Choose dry beans of superior grades, such as navy, black, or kidney beans. Make sure they are thoroughly cleaned and debris is checked.
Vegetables: A variety of vegetables, including carrots, celery, onions, and tomatoes, can be added for taste and nutrition.
Broth or liquid: For the soup’s foundation, vegetable or chicken broth works nicely. Water or a combination of the two are also options.
Seasonings: The flavor of the soup is improved by herbs, spices, and seasonings like garlic, thyme, bay leaves, and salt.
Acid: For safety, a small amount of acid, such as lemon juice or vinegar, is added to assist in maintaining the pH level and stop the growth of bacteria.
Oil: A little oil can make the soup richer.
Make sure all of the equipment is clean and in working order, before you begin. Follow a reliable recipe that specifies proportions and preparation guidelines for the items. To guarantee your canned bean soup’s quality, safety, and lifespan throughout the process, maintain cleanliness and accuracy.
How to Canning Bean Soup?
Preparation:
An essential first step in getting the beans ready for bean soup canning is sorting and cleaning them. This is how you do it:
Sorting: Lay out the dried beans on a spotless, light-colored surface, like a wide tray or a baking sheet. Examine each bean and discard any that are discolored, shriveled, or broken. Additionally, keep an eye out for any potential foreign or small stones that may have gotten into the batch. Throw away any beans that seem to be contaminated.
Rinsing: Sorted beans should be placed in a colander or fine-mesh strainer for rinsing. To get rid of any lingering contaminants, thoroughly rinse them under cold running water. To make sure all surfaces are cleansed, gently shake the beans.
Soaking: Although it is not necessary to soak dried beans for canned bean soup, doing so can help enhance their texture and cut down on cooking time. If you decide to soak the beans, put them in a big dish, cover them with water, and let them sit there all night. Before using, don’t forget to drain and rinse them.
You can improve the flavor and general quality of your soup by making sure that only the best beans are used by taking the time to sort, clean, and possibly soak your beans.
An essential phase in the canning procedure is setting up the canning jars and lids to guarantee that your preserved goods are secure and well-sealed. Here is a general instruction on putting canning jars and lids together:
Compile Materials: Glass canning jars made specifically for canning should be used. There shouldn’t be any flaws, chips, or cracks in them. For each canning session, new lids should be used. A sealing substance found on lids has a single usage only.
Screw bands: These metal bands keep the lids in position while being processed. If they’re in good shape, they can be utilized again. Depending on the type of food being canned, a pressure canner or water bath canner may be used. water, fresh towels, and gentle soap.
Examine the Jar Lids: Check the jars for any flaws such as chips, cracks, or blemishes. Any broken jars should be discarded.
Look for any dents or bending on the lids. Verify the integrity of the sealing compound on the lids.
Scrub Jar Lids: To get rid of any debris, residue, or dirt, wash the jars, lids, and screw bands with warm, soapy water. Make sure there is no soap residue left by giving them a good rinse.
Clean Jars (if necessary): You might need to sterilize the jars depending on the type of canning you’re doing. This is particularly crucial when processing low-acid foods in a water bath canner. Jars should be sterilized by being submerged in a big pot of simmering water. For ten minutes or so, let the jars simmer. Before filling them, keep the jars in boiling water.
Get Lids Ready: Pre-heating some lids is necessary to soften the sealing compound. On the lid package, look for the manufacturer’s instructions.
Fill Jars: When your food is prepared for canning, carefully take a sterilized jar out of the hot water bath, fill it with your prepared food, leave the recommended headspace, and seal the jar.
With a clean, damp towel, make sure there are no food crumbs on the jar’s rim.
Screw on Lids and Bands: Put a cover on the jar’s rim after removing it from the simmering water. Put a screw band on the lid and tighten it just enough to encounter resistance. Avoid over-tightening.
Process Jars: You’ll either process food in a pressure canner or a water bath canner, depending on the recipe and the type of food. Observe the suggested processing intervals and techniques for your particular recipe.
Cooking the Soup:
ingredients:
- 1 cup dried beans (such as navy beans, black beans, or a mix)
- 1 onion, diced
- 2 carrots, peeled and diced
- 2 celery stalks, diced
- 3 cloves garlic, minced
- 6 cups vegetable or chicken broth
- 1 bay leaf
- Salt and pepper to taste
- 2 tablespoons olive oil
- Fresh chopped herbs (such as parsley, thyme, or rosemary) for garnish
Instructions:
To prepare the beans, rinse them with cold water to get rid of any dirt. Alternatively, you can quickly soak the beans by covering them with water, bringing them to a boil, and letting them sit for an hour before draining.
Sauté Aromatics: Heat the olive oil in a sizable soup pot over medium heat. Add the celery, carrots, and onion, all chopped. Sauté for about 5-7 minutes, or until the veggies are cooked and the onion is transparent.
Beans and Garlic: Stir in the beans that have been soaked and then drained. To meld the flavors, sauté for a further one to two minutes.
Pour in the broth and seasonings, then add the bay leaf. The soup should first be heated to a boil before being simmered. For approximately an hour to an hour and a half, or until the beans are cooked, cover and boil the soup.
Once the beans are cooked, discard the bay leaf before seasoning and serving. About 1-2 cups of the soup can be taken out with a ladle and blended until smooth. To thicken the soup, add the blended mixture back to the pot. To taste, add salt and pepper to the food.
You may add different flavors and seasonings to this straightforward bean soup to make it your own. For a smokey or spicy kick, think about including cumin, chili powder, or smoked paprika. For increased depth of flavor, fresh or dried herbs like thyme, rosemary, or parsley can be added while cooking. Just before serving, add a splash of vinegar or lemon juice for an acidic twist. For an extra blast of freshness, don’t forget to put freshly chopped herbs on top of each bowl.
Pour the bean soup into dishes and top with the freshly chopped herbs to serve. For a filling and healthy lunch, serve the soup with a side of salad or crusty bread.
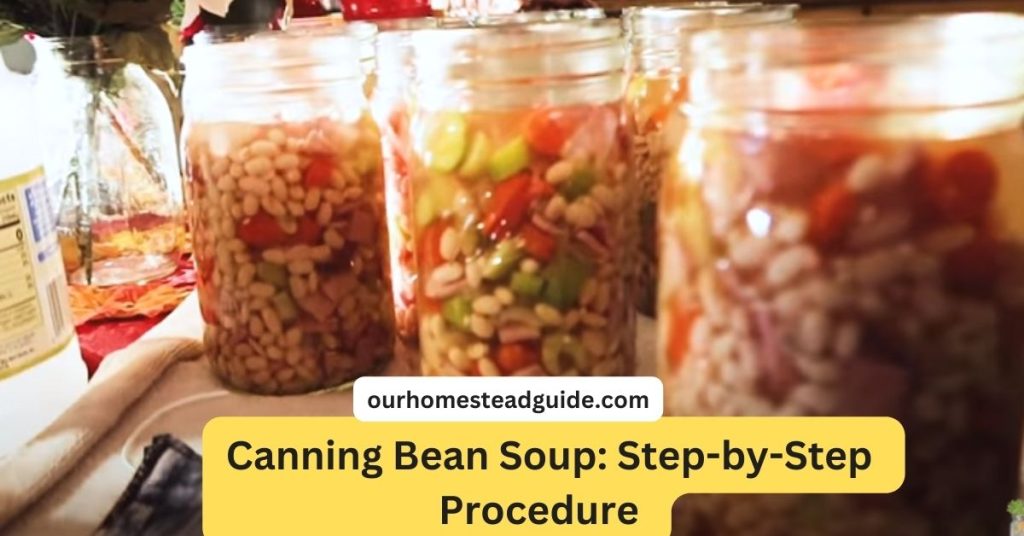
Filling the Jars:
It’s essential to use the correct filling procedure when filling your canning jars with soups, sauces, or other liquid-based items to ensure the optimum amount of headspace. When a jar is sealed and the lid is placed on top of the food, this space is referred to as headspace.
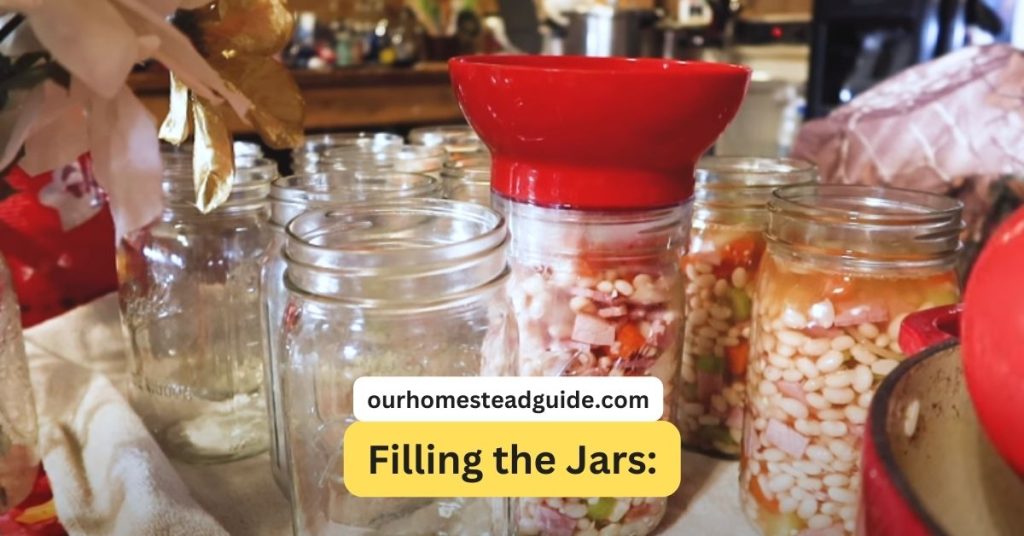
This space must exist in order to properly seal the product and permit expansion during processing. Use a ladle or funnel to fill the jars, allowing the recommended amount of space given in the canning recipe—typically between 1/2 and 1 inch, depending on the food type—to create the proper headspace.
The elimination of air bubbles that have been trapped inside the full jar is also crucial. Take a non-metallic tool, such as a plastic spatula or a bubble remover tool, and carefully run it around the internal corners of the jar after it has been filled but before the lid has been put on. Any trapped air bubbles that can jeopardize the vacuum seal during processing are helped to escape by this procedure.
Uneven heat distribution can cause food to deteriorate and compromise the overall quality of the canned goods if air bubbles are not eliminated. Following these procedures will result in successful canning and long-lasting, safe food preservation by ensuring correct headspace and removing air bubbles.
Sealing the Jars:
A critical step in making sure your canning process is successful is correctly attaching lids and screw-on bands to canning jars. An airtight seal is created by the two-piece lid system, which consists of a flat metal lid with a sealing compound and a separate screw-on band, to stop the growth of dangerous bacteria within the jar.
Make sure that the lids and screw-on bands are clean and defect-free before placing them in the right position. Place your jars’ lids lightly on top of the rims after adding the proper amount of food and leaving the necessary headspace. The jar’s rim should be in touch with the side of the lid that contains the sealing compound.
Then, until you encounter resistance, slowly screw on the band covering the lid. It’s crucial to avoid overtightening the band; a snug fit is adequate. As a result, air can escape during the canning procedure and a vacuum seal is created as the processing jar cools.
Pressure is created during canning as a result of the heat-induced expansion and release of the food and air in the jar. A successful seal is indicated by the center of the lid becoming concave as the jar cools and a vacuum forms. It’s vital to remember that once the jars are properly sealed and cooled, the screw-on band is not required to keep the seal intact.
After the jars have completely cooled and a secure seal has been verified, you can remove the band. Any jars that were not properly sealed will be obvious this way, and you can take appropriate action. In conclusion, the two-piece lid system serves a crucial role in maintaining the freshness and quality of your canned foods by forming an airtight seal.
Processing:
Pressure canning and water bath canning are the two main techniques for processing canned goods, and each is best suited to particular food kinds based on their acidity and density. High-acid items like fruits, jams, jellies, and pickles are best preserved by water bath canning, which involves placing sealed jars in boiling water for a certain amount of time.
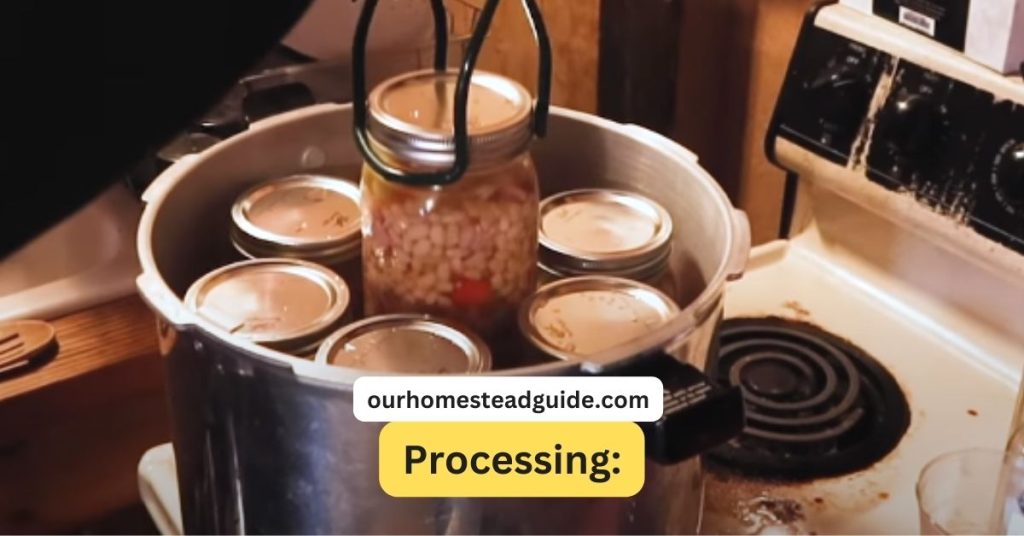
Mold, yeast, and the majority of bacteria cannot develop with this technique. To reduce the risk of botulism and other harmful germs, pressure canning is necessary for low-acid items including vegetables, meats, poultry, and fish. Using a pressure canner to reach higher temperatures that kill spores and germs is known as pressure canning.
The processing time for water bath canning varies depending on the recipe, altitude, and jar size. For instance, a fruit jam might be prepared in a water bath canner for 10 to 15 minutes. On the other hand, pressure canning requires both pressure and timing changes.
Low-acid foods are often processed, depending on the item and altitude, at 10-15 pounds of pressure for 20–90 minutes. To ensure adequate processing durations and pressures and maintain the safety and quality can your preserved foods, it is essential to consult reliable canning resources and adhere to tried-and-true recipes.
Do’s and Don’ts for Successful Canning:

- Do’s:
- Use tested recipes for canning.
- Adjust processing time for altitude if necessary.
- Label jars with date and content.
- Store in a cool, dark place.
- Don’ts:
- Don’t use jars with chips or cracks.
- Don’t skip the recommended processing time.
- Don’t add excessive seasonings or fats.
- Don’t rush the cooling process.
How to Use Canned Ham & Bean Soup
To consume canned ham and bean soup, just reheat it in the microwave or on the stovetop until the required temperature is reached. For a tasty and practical supper, serve hot, and feel free to add extra seasonings or toppings.
Canning Black Bean Soup
To can black bean soup, according to the following instructions: Gather ingredients, pour into sterilized jars, press out air bubbles, cover, process in a pressure canner as directed, allow to cool, inspect the seals, label, and store in a dark, cold location. While maintaining quality and safety, savor the convenience of handmade black bean soup whenever you choose.
How Long to Pressure Can Ham and Bean Soup
The size of the jars, your altitude, and the sort of pressure canner you’re using can all affect how long it takes to prepare ham and bean soup. But generally speaking, most recipes call for processing quarts of ham and bean soup at 10 pounds of pressure for 75 to 90 minutes (adjusting for altitude if required).
For precise recommendations depending on your circumstances, it’s imperative to refer to a trustworthy canning recipe or the instructions supplied by the maker of your pressure canner. Safety should always come first, and canning protocols should always be followed.
Ball Canning Soup Recipes
For tasty and safe results, stick to Ball’s canning soup recipes. Gather ingredients, clean jars, fill jars according to recipe directions, pop air bubbles, put lids on, and process in a pressure canner. For easy and delectable homemade soups, chill, check seals, label, and store in a cold, dark location.
Safety Precautions:
Consumers’ safety and health are seriously in danger from improper canning procedures. The possibility of botulism, an uncommon but potentially lethal form of food poisoning brought on by the toxin produced by the bacterium Clostridium botulinum, is one of the most serious hazards. Low-acid, low-oxygen settings are ideal for the growth of botulism, making inadequately canned low-acid foods particularly vulnerable.
Bulging or leaky lids, obvious mold growth, repulsive scents, strange color changes, and liquid spurting out upon opening are indications of deterioration. It may also indicate bacterial activity if the food appears frothy or effervescent when poured out. It’s critical to err on the side of caution and remove the contents without tasting or swallowing them if any of these symptoms are found.
Canning Bean Soup, It is crucial to use tried-and-true canning recipes, precisely process food using the right techniques, maintain proper headspace, and achieve acceptable sealing conditions in order to reduce these dangers. People can securely make use of the advantages of home-canned items while protecting themselves and their loved ones from potential foodborne illnesses by adhering to established rules.
Conclusion:
assemble sterile tools, sterilize as necessary, prepare ingredients according to a trusted recipe, fill jars precisely, eliminate air bubbles, put lids and bands on, select the best processing method, let the jars cool, inspect the seals, label, and store in a cold, dark location. You and your loved ones may be sure to have a memorable and fulfilling culinary experience by following these instructions.
Most Frequently Asked Questions!
1-Is it safe to can bean soup at home?
Yes, it is safe to can bean soup at home if proper canning techniques are followed. Using tested recipes, maintaining proper hygiene, and following recommended processing times and methods are essential for safety.
2-What type of beans work best for canning bean soup?
Common beans like navy beans, pinto beans, black beans, and kidney beans are often used for canning bean soup. These beans hold up well during the canning process and maintain their texture.
3- Can I have bean soup with meat?
Yes, you can have bean soup with meat. However, it’s important to use lean meats and follow appropriate canning guidelines to ensure the meat is safely preserved. High fat content can lead to spoilage and unsafe conditions.
4- Do I need to cook the beans before canning bean soup?
Yes, you should fully cook the beans before canning bean soup. The canning process is meant for preserving cooked ingredients, so make sure the beans are tender before assembling the soup for canning.
5- Can I add vegetables to my canned bean soup?
Yes, you can add vegetables to your canned bean soup. However, certain vegetables can become mushy during the canning process. To avoid this, you can blanch the vegetables before adding them to the soup.
6- Do I need to add any preservatives to my canned bean soup?
No, you don’t need to add preservatives to your canned bean soup. The canning process itself preserves the contents by sealing them in a sterile environment.
7- What kind of broth or liquid should I use for canning bean soup?
You can use vegetable broth, chicken broth, beef broth, or water as the liquid for canning bean soup. The choice of liquid will depend on your flavor preferences.
8- Can I use dairy or cream in canned bean soup?
It’s not recommended to use dairy or cream in canned soups. Dairy products can curdle and lead to unsafe conditions during the canning process. If you want a creamy soup, it’s better to add dairy when reheating the canned soup.
9- How long does canned bean soup last?
Properly canned and sealed bean soup can last for up to 1 to 1.5 years, or even longer, when stored in a cool, dark, and dry place. However, for the best quality, it’s recommended to consume it within a year.
10- What equipment do I need for canning bean soup?
You’ll need canning jars, lids, and rings, a pressure canner (for low-acid foods like beans), a large pot for cooking the soup, basic kitchen tools, and a reliable recipe from a trusted source.
you may also like this article.